Git & Github : Basic to Advanced
This will be a guide to learning Git and using Github. From using local git repo, to hosting your code in github.
What is Git ?
Git is a mature, actively maintained open source project originally developed in 2005 by Linus Torvalds, the famous creator of the Linux operating system kernel. A staggering number of software projects rely on Git for version control, including commercial projects as well as open source.
 It is used for tracking changes in any set of files, usually used for coordinating work among programmers collaboratively developing source code during software development. Its goals include speed, data integrity, and support for distributed, non-linear workflows.
What is GitHub ?
GitHub is a for-profit company that offers a cloud-based Git repository hosting service. Essentially, it makes it a lot easier for individuals and teams to use Git for version control and collaboration.
 GitHub’s interface is user-friendly enough so even novice coders can take advantage of Git. Without GitHub, using Git generally requires a bit more technical savvy and use of the command line.
Now you might be wondering what is the difference between Git & Github right. Well that is tackled right below, keep reading.
Git v/s GitHub ? What is the difference ?
So, taken all together: Git vs. GitHub… what’s the difference? Simply put, Git is a version control system that lets you manage and keep track of your source code history. GitHub is a cloud-based hosting service that lets you manage Git repositories. If you have open-source projects that use Git, then GitHub is designed to help you better manage them.
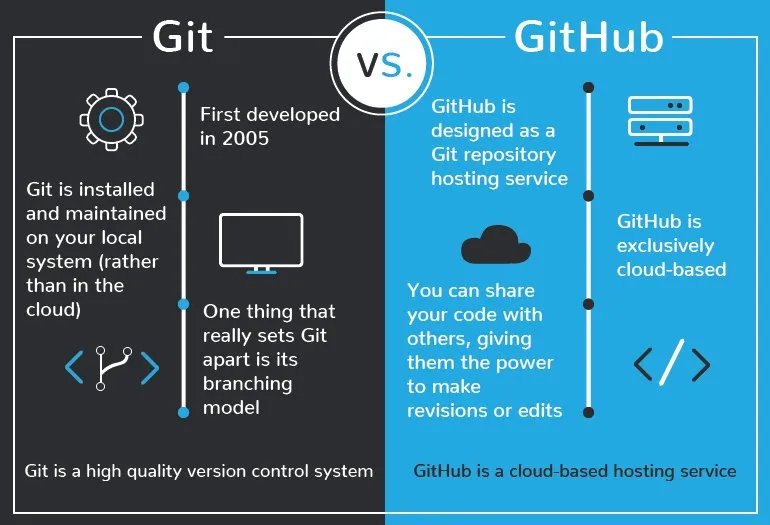 After all, in the world of programming, naming conventions aren’t always intuitive. That’s why it’s worth recognizing the connections and the differences in the similarly named Git and GitHub. Both Git and GitHub give programmers valuable version-control functionality so that they can build ongoing coding projects without being afraid of messing everything up. GitHub just takes things a little bit further than Git, offering more functionality and resources, as well as a place online to store and collaborate on projects.
And that’s essentially it. Simple, right? Well much of theory for now, lets get to the hands-on experience.
Installation and Setup
First install the Git Software from https://git-scm.com/downloads. Download the respective file suitable for you machine Windows/MacOS/Linux. After download just go through the the installation procedure and voila!!! you have successfully installed Git on your system.
Wait! We also have to make an account on Github to access their service. Head on to https://github.com and create an account, it’s really simple and well guide. After the account creation, you are now ready to do a deep dive. Who’s up for an adventure !!!
Defining ourselves to Git, open up a terminal (if in linux/macOS) or Command Prompt (if in windows) and type the following :
git config --global user.email "<your\_email>@example.com"
git config --global user.name "<your\_password>
Creating & Working with a repo from Scratch
- Create a directory to contain the project. Suppose this and let us name it
learn-git - Go into the new directory. From the terminal(for linux/macOS)/CMD(for windows) use this command
cd learn-git - Let us create a file
hello-world.txtinside thelearn-gitfolder for our better understanding. - And now finally initialise git for tracking out files in the project, for that we make sure we are inside the project directory
learn-gitand we type the commandgit init. Voila !!! you have successfully initialised git in your project. - Now we have to tell git, which files you want to track and bring to the staging area, now you might be confused what is the staging area, we will get back to that in a moment. Now lets add the file
hello-world.txtto git. For that type the commandgit add hello-world.txt. You can also you add multiple files together usinggit add . - Now we need to commit to finalise everything. For that a commit message is always used which helps us understand at a later stage what we changed in that specific commit. So let’s run the command
git commit -m "initial commit"And yesssss!!! we are done .
We have created a git repo and commited code to locally, we still havent hosted to code to a remote repository, over GitHub. For that follow the following simple steps.
- Go to github.
- Log in to your account.
- Click the new repository button in the top-right. Name the repo
learn-git.You’ll have an option there to initialize with some files, just uncheck all of them. - Click the “Create repository” button.
Now, follow the second set of instructions, “Push an existing repository…”
git remote add origin https://github.com/<your\_username>/learn-git
git push -u origin master
And you have successfully pushed your code to GitHub and now is publicly accessible to everyone(But they can’t edit your hosted code).
Understanding how git manages stages
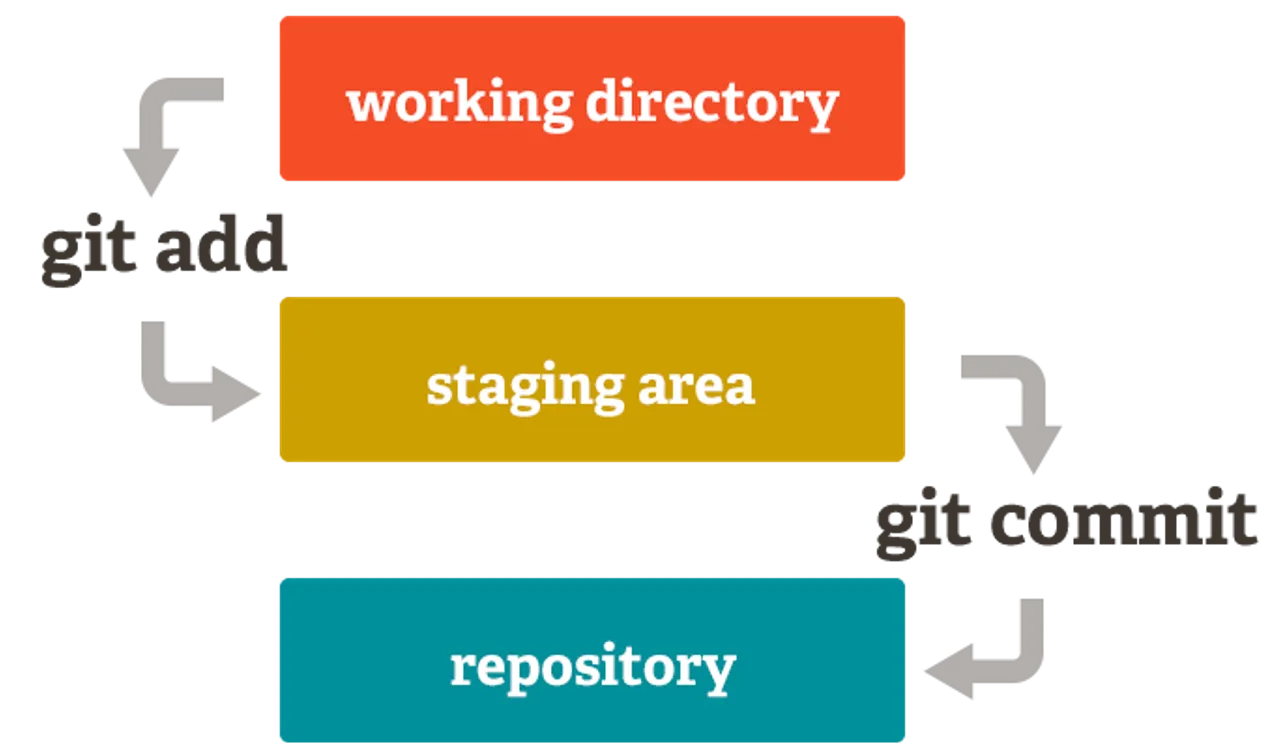 Now you know what happened when you did
 git add and git commit . A more clear understanding is also required to dive deeper, no worry, all is there.
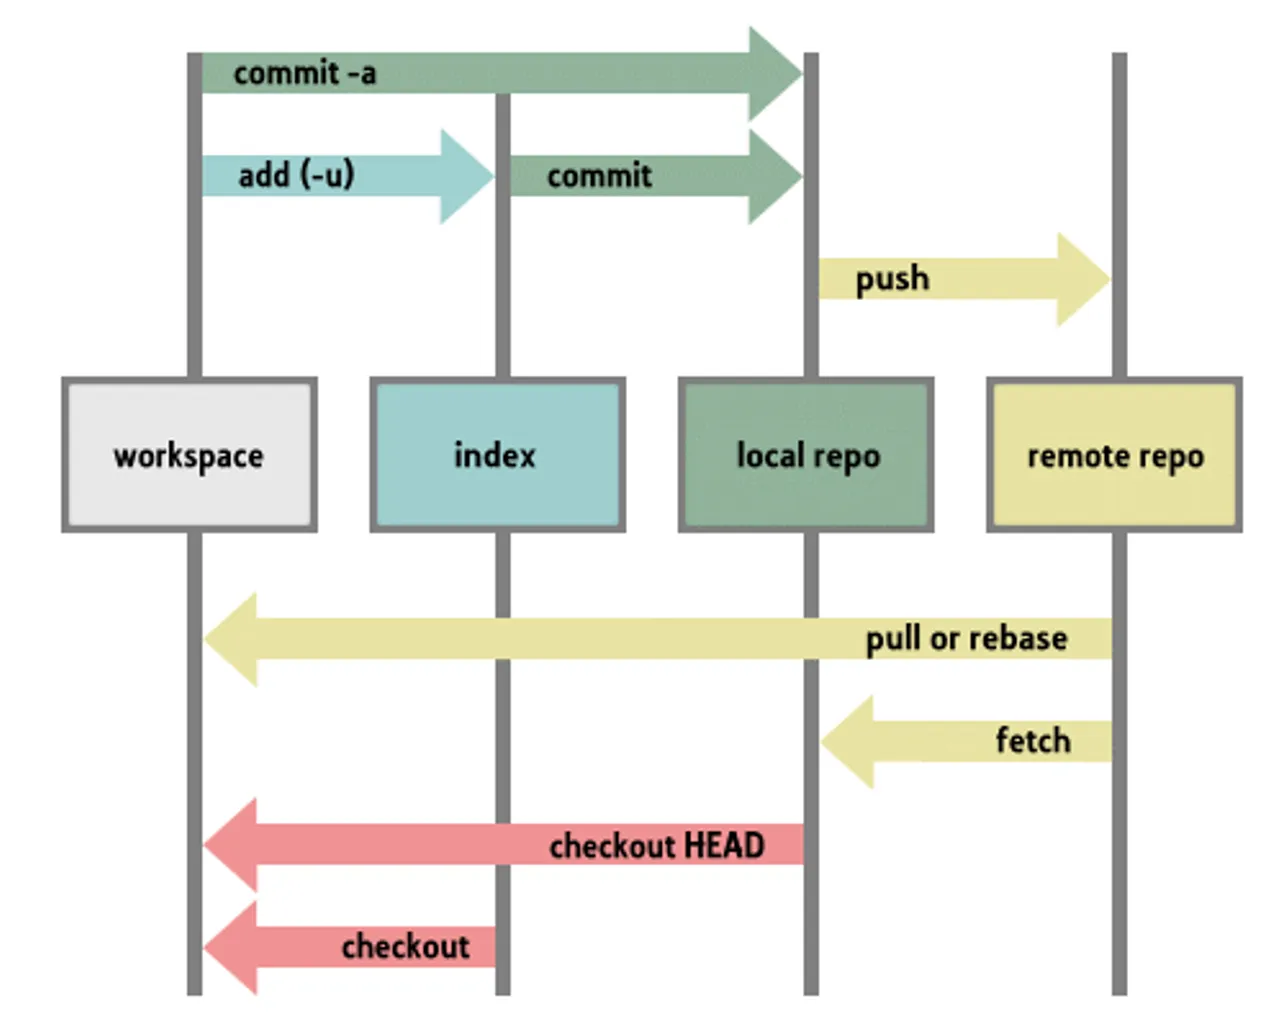 Here you get a much clearer explanation of whats happened when you ran all those commands.
Lets talk about Branching
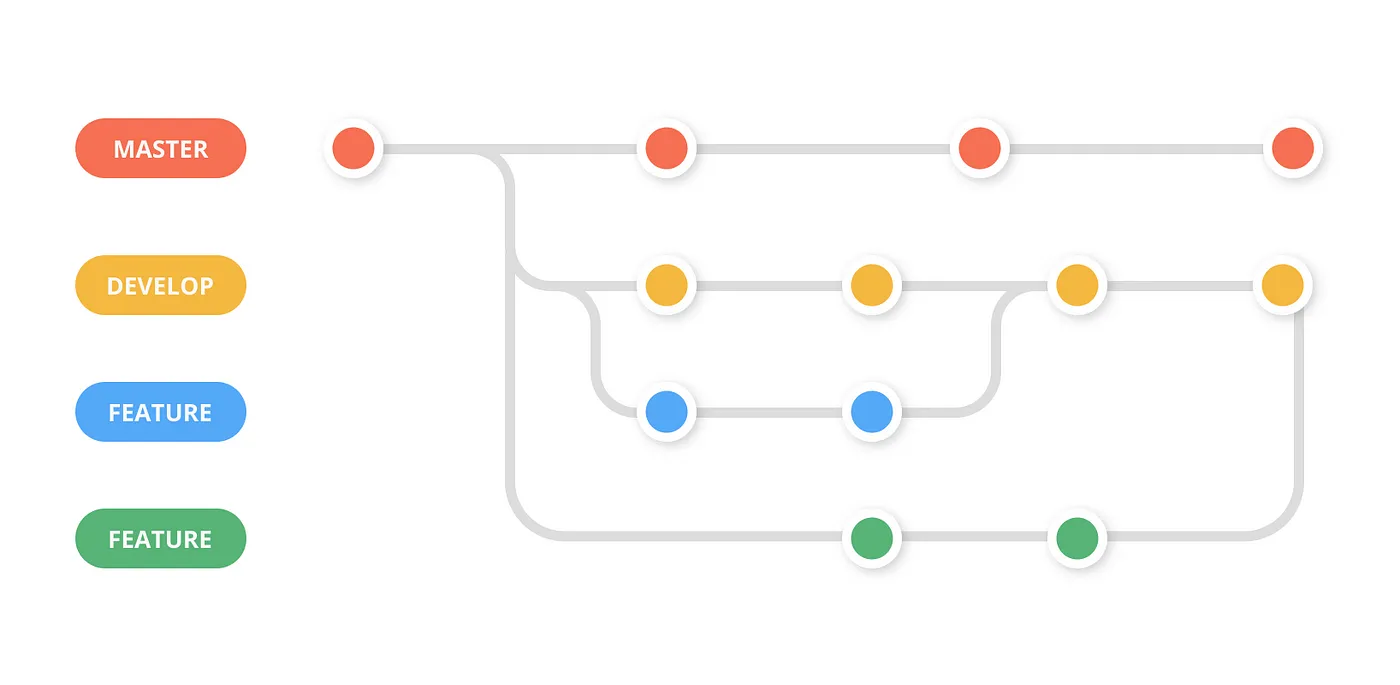 When you create a repository with content on GitHub.com, GitHub creates the repository with a single branch. This first branch in the repository is the default branch. The default branch is the branch that GitHub displays when anyone visits your repository.
When you’re working on a project, you’re going to have a bunch of different features or ideas in progress at any given time — some of which are ready to go, and others which are not. Branching exists to help you manage this workflow.
When you create a branch in your project, you’re creating an environment where you can try out new ideas. Changes you make on a branch don’t affect the master branch, so you’re free to experiment and commit changes, safe in the knowledge that your branch won’t be merged until it’s ready to be reviewed by someone you’re collaborating with.
To create a branch run the following commands
git switch -c "beta2.0"
This command creates a branch beat2.0 and automatically you switch to that branch. To revert back to the master branch type git switch master and you will be back in the master branch, changes in the beta2.0 branch wont affect the code in the master branch. Ain’t that something like magic !!!!
To see what branches are in your project and which branch you are in type the command git branch .It shows all the available branch in your project and also marks the branch that you are in
To get a more detailed info you status of you project just type the following command.
git status
The git status command displays the state of the working directory and the staging area. It lets you see which changes have been staged, which haven’t, and which files aren’t being tracked by Git. Status output does not show you any information regarding the committed project history.
Conclusion
And there you go !!!. You have successfully learnt all the intricasies of git and GitHub, but still left with understanding and doing open source contribution. Will followup with a detailed blog for that soon.
Till happy gitting !!!!! And follow me over my github profile https://github.com/advaita-saha